Exercise 1 Puncturing
I began by collecting together a range of tools to pierce the paper. Using a selection of sharp, blunt, narrow and wide. Using cartridge paper as my base material to experiment with. One thing I found was that the blunt tools created rough holes as did the wider tools.
Once I had worked out what tools worked well I moved onto making a selection of random and more formal patterns of puncturing. Using different amounts of pressure and holding the tool a different angles.
I then wanted to see how the puncturing effect changed with the use of different materials such as card, mulberry paper, water colour paper, cellophane, polystyrene and tracing paper. A lot of the papers worked in the way I thought they would. The thinner papers ripping with blunter tools and having to working slowly with the shaper tools. The wider tools were difficult to work with if used quickly as they made very untidy holes and even ripped them. Generally the thicker materials created a nicer selection of punctured holes.
I then wanted to develop what I had discovered further, researching on Pinterest artists that use puncturing in their work. https://pin.it/4xt75tY
One of the artist that uses puncturing as a key feature of her work is Gillian McFarland I liked the circular motion and natural swirls, it all felt very organic. I also felt her use of material keeping very plain helped to emphasis the importance of the punctured marks.

The next sample had potential but perhaps was not as well executed as it could have been. Using tracing paper to create curving, sweeping lines across the page. On reflection I wish I hadn't drawn the lines on as this is clearly visible on through the tracing paper. I also feel as though a wider selection of puncture marks in varying distances apart.
My next sample went for a more regimented design, as I had seen on Pinterest. Well I tried to be more regimented I must admit I could have been neater. But I feel the varying size puncture marks in a semi-regimented pattern on the black paper worked well.
I next wanted to move onto more abstract materials. I chose to work with leaves, choosing a fresh leaf and a fallen dried leaf. The puncture marks on the dried were my favourite, using a small pin to create random puncture marks on different segments of the leaf giving a decayed look to the leaf.
I began this exercise with looking at what materials worked well with the previous exercise. I then gathered a collection of yarns together to use. Taking inspiration again from artists who use puncturing as part of their work.
I then wanted to research other artists taking to Pinterest for inspiration https://pin.it/1hdmnO3. One of the piece I came across was the one pictured below by Leisa Rich called Immerse. Using tracing paper to create the what believe to represent the delicate ice, with the thin stitches of cotton representing the crack in the ice.
This inspired me to combine yarns that complimented the material I was working with from delicate to sturdy, from natural fibres to manmade plastics.
For my first sample using a swirling pattern to create different sections and defining those sections with vertical and horizontal in a mixture of neutral tone yarns which worked with the natural tones of the mulberry paper. I particularly like the colour combination with the mixture of stitches work well together. With the back of the piece being just as interesting visually.
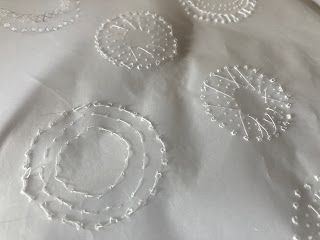
Going for a more delicate effect for this sample, using a small needle to make circular designs across tracing paper. I originally wanted tried to use nylon thread to create a delicate transparent effect. Unfortunately it did not work out as it was fine and ridged and kept pulling through the punched holes. I found the white cotton worked well and combined a combination of stitches around the circles. Creating a lace effect.
My next selection of samples explored the use of leaves again. Using them in completely different ways. The dried leaf creating holes as though a hungry caterpillar had eaten through the leaf leaving a trail (fabric offcut) behind it.
And then for the green leaf creating tiny spiderwebs over the punctured holes with nylon thread. Adding detail to the leaf by adding tiny holes in random places across the leaf. An interesting effect which I did not plan on achieving was the colour change where the holes were made. These appeared over night and made interesting unique patterns.
I was not as pleased with this sample, using a sample base of cellophane and sugar paper from a previous exercise. Then adding twine in a crossover lacing fashion across the sample. I don't feel the puncture marks or twine work well with the base materials. And the twine colour being so close to the papers colour it is lost in the sample.
Pushing my creativity further, I wanted to try a material which had not worked well in a previous exercise and see if I could make it would by combining it with wire. Taking tin foil and concertinaing, to create something that resembles a corrugated sheet. Piercing the foil with a clay tool, piercing it through the foil when it was folded. Then unwinding the copper wire I chose to work with. When unwinding the wire it had a wave to the wire. I wanted to keep this as I felt it was in keeping with the wavy lines of the folds. Then threading the wire through the punctured holes.
Reflecting on this piece I like foil crease marks made a really interesting texture across the foil with the lights, giving quite a futuristic effect. Unfortunately at a distance wire becomes lost against the foil background. Perhaps using a thicker wire could have been a better option to make the wire a more prominent in the sample.
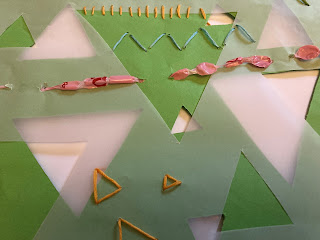
For my final sample I tried to push myself out of my comfort zone, exploring more colour in my studies. Using the papers from a previous exercise, then taking lengths of carrier bag plastic, stretching them out to make them easier to thread through. The pink plastic created an interesting bobbled effect with each pull. Using a mixture of larger and smaller tools to create the punctured marks. Threading a mixture of the plastic and embroidery threads through the layered papers, in a variety of stitches. Trying to focus some of them on the triangles, making triangles from the plastic and thread as well as zigzag lines.
I definitely want to explore colour further and look at interesting colour combinations and how they can work well together.


No comments:
Post a Comment