Project 1 Folding and Crumpling
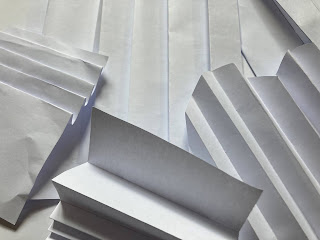
I approached this task by gathering a selection of papers to work with. Thinking about size and the weight of the papers. I thought that printer paper was a good starting point to work from. Making my way through the different types of folds, linear pleats, rotational accordion pleats, knife and box pleats, and incremental and twisted pleats.
Using the printer paper as a starting point helped to gauge the best way to fold the papers and the best widths for the pleats. What did become apparent was the fact I could not fold straight or accurately, with the pleads ending up a various angles and sizes.
From that point I decided I was going to draw on the crease lines on with a ruler, again though they weren't always accurate in size or always perfectly straight.
Printer Paper
This led me onto my next paper choice, graph paper! This meant I could draw more accurate lines and the creases be nice and straight. I also found that drawing the lines help the paper fold, is was especially true on the heavier paper. Overall I preferred the more accurate folds, which is unusual as I am usually more of a fan of the more natural, rustic look in my work.
Graph Paper
The next material I chose to use was the newspaper, this meant I was able to use larger scale pieces for this folding exercise. Although I found it incredibly difficult to found the newspaper as it was flimsy, I tried doubling the paper up to increase the thickness to see if that made the folds any easier. Unfortunately it did not make much difference and the folds did not hold very well. I also realise due to the print on the paper it makes the folds very difficult to define. Using such a thin, flimsy fabric like chiffon to create pleats in.
Newspaper
The next paper had the appearance of being more fragile but was stronger and held the creases well. Although if it was creased to roughly it easily ripped along the seamline. I find the tracing paper aesthetically pleasing as it held neat, straight pleats, with the stark frosty white colour. The emphasised pleats from the light and shade from the light hitting the creases. The tracing paper I could imagine being a silk based fabric with a soft floaty effect yet holding the pleats well and keeping its shape.
Tracing Paper
The next material I chose to work with was water colour paper. This would allow for a thicker base material, which would in turn mean that the folds/pleats were easier to form and hold. Using the ruler technique to draw the lines also helped to improve the quality of the crease. This was a great material to work with as the matt effect of the paper emphasised the mountains and valleys. The the stiffness of the paper holding the pleats/folds in place. If this was a fabric I could imagine it being a heavy polyester/cotton fabric.
Water Colour Paper
I wanted to try another thick material so I sourced photo paper, giving me a firm base but with a shiny surface unlike the matt water colour paper. I thought it would fold in a similar way but it did not work in the same way. The folds were not as defined and tore easily if I over creased the paper. I also found the shiny surface not as aesthetically pleasing.
Photo Paper
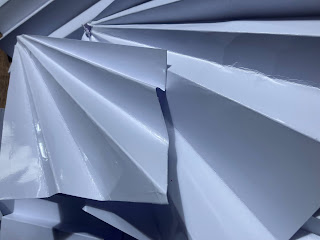
Coming away from traditional papers, I wanted to try cellophane. I felt like it would be interesting to see the folds through the material. I thought the folds were holding well when I began creasing the lines, having to score along with my nail to make a more defined crease. When the cellophane was folded up it looked like it would hold but once I began to unfold the the cellophane it kept folding back on in itself. I then tried to pull it out and this caused the cellophane to crease at an unusual angle, causing the creases to flatten out. Overall it was a tricky material to work with but I do like the way you can see through to the folds creating another level to the pieces. Perhaps a thicker plastic would have worked better.


For my final materials I wanted experiment with a couple of more unusual materials, using tracing paper and tin foil. Neither were very successful the tracing paper was to fragile and soft so did not hold the folds well. And the foil was to flexible and would easily drop the folds when when moved or touched.
At first I wondered why we were given this exercise, but as I went through the exercise I realised how this translated into the textile world. How different thicknesses, textures and sizes and how these variations can alter the appearance and effectiveness of the pleats and folds.
Basic Crumpling Technique
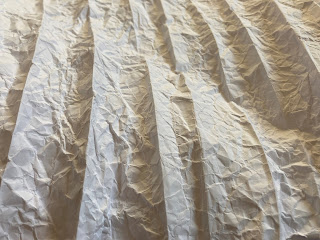
Crumpling- single rib
One thing I noted as I was scrunching up the paper into a
ball repeatedly was how texture of the paper changed. Changing from the flat,
rigid surface to a softer more malleable surface, the first single rid and the
multiple ribs were easy to produce. Using my nails to make a more defined rid,
and using the light to help capture the creases and ribs to make it easier to
define in my sketches. Using the different greys/blues in the dips and valleys
to shade in the areas in my sketches.
Crumpling- ribs radiating from a single point
The ribs meeting at a central point I thought would be as
easy as it would be a similar process to the last two exercises. Which in
theory it was but to try and get the lines to meet in the middle, trying to
fold each line to the central point without creating unwanted creases.


Crumpling- circular ribs
The ridges were quite simple to create, whereas the circular
creases were a lot more complex. I began with trying to mould the paper around
circular items, but the crease lines were too soft. I resorted to using
my nail again turning the paper around in my hand to create a circular crease.
Starting with the smaller circle in the middle and then making my way out to
the edge of the paper. I did find that by the time I had reached the outside of
the paper the middle circles were not as defined as they were.
For the next part I spent sometime searching the house for some unusual shapes to mould the paper around. The first item I wanted to use was a hexagon pot, using the lip of pot the crease the lines into. Although the shapes were success creased into the paper, it was not visually interesting. So I carried on developing the samples further. I then tried to wrap the paper around a rolling pin, this was not successful and there was no change made to the paper so I moved on the next item.
I next took inspiration from the sample exercise but instead of egg cups I chose to use an egg box instead. Moulding the paper around the egg box, this didn't create the more ridged lines like the hexagon pot. Instead creating a softer landscape creating mountains and valleys. I liked the effect that was made the gentle spikes popping out of the sheet.
For my final piece instead of moulding around an object, I decided to mould into the object. Using a wired cooling rack to push the paper through the squares. I think it may have been easier to mould as it had been crumpled so many times making the paper softer and more easier to manipulate.
Linear Crumpling Technique
Taking a new sheet of A3 paper and rolling it into a cylinder and scrunching up and down the cylinder, creating multiple creases vertically down the paper. Making it softer and easier to manipulate.
Long ribs
Now I had the paper adequately creased I began create the long ribs horizontally. Using my nail again to create more defined creases. I liked the way the creases go in the opposite direction, creating interesting lines and shadows across the sheet.
Short scattered ribs
Rerolling and creasing the paper, making short scattered ribs across the sheet. Choosing again the produce them in a horizontal, creating mountains across the paper. Again being picked up by the light casting shadows across the white paper.
Sculptural Forms
For my final piece in this exercise, I chose to use a contrasting shape to the straight lines of the creases. Making circular forms moulding the shapes around circular shape items. Reflecting of how the final piece looks, I don't think the circles are as striking as the ribs. The shadows cast are not as clear, creating a softer effect.
Rotational Crumpling Technique
Spiral Ribs
I somehow managed to make this piece into a large circle, using the same technique from the previous exercise. I do not feel that this technique was as successful as the previous techniques. The corners of the paper became for like legs, which is not the effect I was hoping to achieve.
Sculptural Forms
Although the first piece in the rotational crumpling technique was not successful. The second one is of my favourite pieces across this project, the final piece reminded me of a flower or a frozen ice sculpture. Manipulating the paper into different shapes.
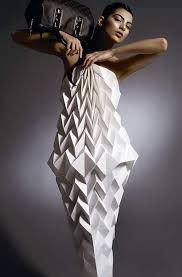
I wanted to look at recreating some of the material distortions from the my research. Creating geometric folds into a tracing paper to replicate the work of Jule Waibel. Taking inspiration from one of her dresses which is pictured below, using a template a folding design from the book Folding Techniques for Designers by Paul Jackson. I chose to work with tracing paper, although it gave a look of being fragile it is quite robust material which held the creases well. And the light reflecting off the creases showed the geometric patterns clearer.
My next selection of samples were inspired by Deepa Panchamia. Taking sheets of cellophane and a sheet of tracing paper. And crumpling them to make them easier to mould into shapes. I took two different types of cooling racks and pressed the sheets into the racks ensuring to crease along the wire to create more defined lines. I think all three of the samples were successful, producing interesting textures and patters across the material.
https://deepapanchamia.com/










No comments:
Post a Comment